CentOS 5.3 X64 yum update时出现问题 与 解决办法

在yum update时出现如下错误

–> Processing Conflict: python-devel conflicts python < 2.4.3-24.el5_3.6
–> Finished Dependency Resolution
python-devel-2.4.3-24.el5_3.6.i386 from update has depsolving problems
–> python-devel conflicts with python
Error: python-devel conflicts with python

在网上查找各种方法:
大部分说是python-devel2.43与2.44同时安装的结果,可是我的不一样

[root@centos images]# yum list installed python python-devel
Loaded plugins: fastestmirror
Installed Packages
python.x86_64 2.4.3-24.el5 installed
python-devel.i386 2.4.3-24.el5 installed
python-devel.x86_64 2.4.3-24.el5 installed

看是python-devel.i386 与python-devel.x86_64同时安装了,一个是32位的一个是64位的,删除32位的,我系统是X64的

[root@centos images]# rpm -e python-devel.i386

删除后再来看看

[root@centos images]# yum list installed python python-devel
Loaded plugins: fastestmirror
Installed Packages
python.x86_64 2.4.3-24.el5 installed
python-devel.x86_64 2.4.3-24.el5 installed

现在看来是正常了,再升级看看

[root@centos images]# yum update
Transaction Summary
=====================================================
Install 9 Package(s)
Update 57 Package(s)
Remove 0 Package(s)

Total download size: 129 M
Is this ok [y/N]: n
Exiting on user Command
Complete!

一切正常了
——————————————————-
发现,如果更新源选择的不对也会出现此问题
比如X64的系统用i386的源
先把源的配置搞正确
/etc/yum.repos.d/CentOS-Base.repo

[base]
name=CentOS-5 – Base
#mirrorlist=http://mirrorlist.centos.org/?release=$releasever5&arch=$basearch&repo=os
#baseurl=http://mirror.centos.org/centos/$releasever/os/$basearch/
baseurl=http://ftp.sjtu.edu.cn/centos/5.3/os/$basearch/
gpgcheck=1
gpgkey=http://mirror.centos.org/centos/RPM-GPG-KEY-centos5

#released updates
[update]
name=CentOS-5 – Updates
#mirrorlist=http://mirrorlist.centos.org/?release=4&arch=$basearch&repo=updates
baseurl=http://ftp.sjtu.edu.cn/centos/5.3/updates/$basearch/
gpgcheck=1
gpgkey=http://mirror.centos.org/centos/RPM-GPG-KEY-centos5

#packages used/produced in the build but not released
[addons]
name=CentOS-5 – Addons
#mirrorlist=http://mirrorlist.centos.org/?release=4&arch=$basearch&repo=addons

baseurl=http://ftp.sjtu.edu.cn/centos/5.3/addons/$basearch/
gpgcheck=1
gpgkey=http://mirror.centos.org/centos/RPM-GPG-KEY-centos5

#additional packages that may be useful
[extras]
name=CentOS-5 – Extras
#mirrorlist=http://mirrorlist.centos.org/?release=4&arch=$basearch&repo=extras

baseurl=http://ftp.sjtu.edu.cn/centos/5.3/extras/$basearch/
gpgcheck=1
gpgkey=http://mirror.centos.org/centos/RPM-GPG-KEY-centos5

#additional packages that extend functionality of existing packages
[centosplus]
name=CentOS-5 – Plus
#mirrorlist=http://mirrorlist.centos.org/?release=4&arch=$basearch&repo=centosplus
baseurl=http://ftp.sjtu.edu.cn/centos/5.3/centosplus/$basearch/
gpgcheck=1
enabled=0
gpgkey=http://mirror.centos.org/centos/RPM-GPG-KEY-centos5

#contrib – packages by Centos Users
[contrib]
name=CentOS-5 – Contrib
#mirrorlist=http://mirrorlist.centos.org/?release=4&arch=$basearch&repo=contrib
baseurl=http://ftp.sjtu.edu.cn/centos/5.3/contrib/$basearch/
gpgcheck=1
enabled=0
gpgkey=http://mirror.centos.org/centos/RPM-GPG-KEY-centos5

再清一下缓存
yum clean all
再升级一下,看看,应该没问题了吧
——————————————————-
如果出现
Metadata file does not match checksum
运行
yum clean all
就可以了

先这样了,哎,今天遇到的问题好多呀 [cry]

——————————————————-
当升级一半而强行中断后
再见升级可能会出现依赖问题,使用
package-cleanup –problems
把列出的包卸载,然后再升级,就好了

NFS 服务器 详细配置 笔记

NFS详细设置

1.准备工作
NFS与RPC
启动NFS之前要先启动RPC(一般系统默认启动),否则NFS无法向RPC注册

2.运行NFS要启动的RPC daemons
  1.rpc.nfsd
    管理是否可以登陆主机和管理登入者的ID
  2.rpc.mountd
    判断NFS文系统的权限
  3.rpc.lockd(可选)
    可以管理文件的锁定
  4.rpc.statd  (可选)
    检查文件的一到致性

提示:要弄清NFS服务器与登入者主机上的用户的对应关系,这个很重要

3.NFS的结构
NFS主程序为nfs-utils
RPC主程序为portmap
———————
  1./etc/exports
  主要的配置文件
  /tmp  192.168.1.0/24(ro)  localhost(rw)  *.kumouse.com(ro.sync)
  可用的参数
  rw:可读写
  ro:只读
  sync:同步写入
  async:先暂存于内存中
  no_root_squash:如果是root,则以root的权限访问
  root_squash:如果是root,则压缩成匿名用户
  all_squash:将所有登陆用户压缩成匿名用户
  anonuid:将匿名者变为指定的uid
  anongid:匿名者指定gid

  注意:只有域名可以使用通配符,IP不可以用通配符
———————
  2./usr/sbin/exportfs
    变更共享目录的命令
  参数:
    -a:全部挂载或卸载/etc/exports内的设置
    -r:重新挂载/etc/exports里的设置
    -u:卸载某一目录
    -v:在exports执行的时候,将共享目录显示出来
  例:  exportfs -arv #重新挂载所有
    exportfs -auv #全部卸载

———————
  3./usr/sbin/showmount
    客户端用来查看共享资源的
    showmount -a 192.168.1.22 查看联机状态
    showmount -e 192.168.1.22 查看主机共享的目录数据
———————
  4./var/lib/nfs/*tab
    NFS服务器的日志,主要有etab:目录的完整权限.xtab:连接到此服务器的客户端数据
———————

4 启动
/etc/init.d/portmap start #启动RPC
/etc/init.d/nfs start #启动NFS

rpcinfo -p localhost #查看RPC的注册情况

5.联机
[root@centos mydisk]# showmount -e 192.168.1.22
Export list for 192.168.1.22:
/home/tftpboot 192.168.1.0/24
/home/save 192.168.1.0/24
/home/iso 192.168.1.0/24

6.NFS安全
———————-
  1.iptables.allow
  iptalbes -A INPUT -i $EXTIF -p TCP -s 192.168.0.0/24 –dport 111 -j ACCEPT
  iptalbes -A INPUT -i $EXTIF -p UDP -s 192.168.0.0/24 –dport 111 -j ACCEPT
  2.tcp wrappers
  /etc/hosts.allow
  mountd:192.168.1.0/255.255.255.0
  /etc/hosts.deny
  mountd:ALL
  3.关机
  先关portmap然后nfs
  用netstat -utlp找出PID KILL了他
———————–

7.远程挂载 mount
挂载的参数
suid与nosuid:开放或取消SUID功能,默认为suid
rw,ro:指定可读写或只读,默认为rw
dev,nodev:是否可以保留装置文件的特殊功能,默认为dev
exec,noexec:是否具有可执行权限,默认为exec
user,nouser:是否具有进行挂载与卸载的功能,默认为nouser
auto,noauto:指mount-a时会不会被挂载的项目,如不需要可设为noauto,默认为auto

fg,bg:前台执行或后台执行,默认为fg
soft,hard:是否在挂载时持续呼叫,默认为hard,建议用soft
intr:加上它,若使用hard方式时,RPC呼叫可以被中断
rsize,wsize:写缓冲区与读缓冲区,可提高性能,很重要

例:mount -t nfs -o nosuid,noexec,nodev,rw,bg,soft,rsize=32768,wsize=32768 192.168.1.22:/home/iso /iso
注意:两个缓冲区很重要,如果不设置NFS的性能会非常低,不会超过1M/S,切记,我试过了
服务器/etc/exports中可以用async方式提高性能,默认是sync,关机时别忘了用sync回写

8.开机挂载
/etc/fstab
192.168.1.22:/home/iso  /iso  nfs  nosuid,noexec,nodev,rw,bg,soft,rsize=32768,wsize=32768  0  0

autofs的使用
/etc/auto.master
/iso  /etc/auto.nfs

/etc/auto.nfs
iso  -rw,bg,soft,rsize=32768,wsize=32768  192.168.1.22:/home/iso

linux 安装驱动 与相关内容

安装驱动

1.查看开机网卡的加载情况
[root@localhost mydisk]# dmesg|grep -n eth
383:e100: eth0: e100_probe: addr 0xdc100000, irq 90, MAC addr 00:01:B3:36:DB:1A
392:sky2 eth1: addr 00:13:d4:9d:65:38
426:sky2 eth0: enabling interface
427:sky2 eth0: ram buffer 48K
428:ADDRCONF(NETDEV_UP): eth0: link is not ready
429:sky2 eth0: Link is up at 100 Mbps, full duplex, flow control both
430:ADDRCONF(NETDEV_CHANGE): eth0: link becomes ready
441:eth0: no IPv6 routers present

2.按行号查看
[root@localhost mydisk]# dmesg|cat -n|less

3.查看模块信息
[root@localhost mydisk]# modinfo sky2
filename: /lib/modules/2.6.18-128.el5/kernel/drivers/net/sky2.ko
version: 1.14
license: GPL
author: Stephen Hemminger <shemminger@linux-foundation.org>
description: Marvell Yukon 2 Gigabit Ethernet driver
srcversion: 24BB88B15DBF35BF3881E0F
alias: pci:v000011ABd0000436Bsv*sd*bc*sc*i*
alias: pci:v000011ABd0000436Asv*sd*bc*sc*i*
alias: pci:v000011ABd00004369sv*sd*bc*sc*i*
alias: pci:v000011ABd00004368sv*sd*bc*sc*i*
alias: pci:v000011ABd00004367sv*sd*bc*sc*i*
alias: pci:v000011ABd00004366sv*sd*bc*sc*i*
alias: pci:v000011ABd00004364sv*sd*bc*sc*i*
alias: pci:v000011ABd00004363sv*sd*bc*sc*i*
alias: pci:v000011ABd00004362sv*sd*bc*sc*i*
alias: pci:v000011ABd00004361sv*sd*bc*sc*i*
alias: pci:v000011ABd00004360sv*sd*bc*sc*i*
alias: pci:v000011ABd00004356sv*sd*bc*sc*i*
alias: pci:v000011ABd00004353sv*sd*bc*sc*i*
alias: pci:v000011ABd00004352sv*sd*bc*sc*i*
alias: pci:v000011ABd00004351sv*sd*bc*sc*i*
alias: pci:v000011ABd00004350sv*sd*bc*sc*i*
alias: pci:v000011ABd00004347sv*sd*bc*sc*i*
alias: pci:v000011ABd00004346sv*sd*bc*sc*i*
alias: pci:v000011ABd00004345sv*sd*bc*sc*i*
alias: pci:v000011ABd00004344sv*sd*bc*sc*i*
alias: pci:v000011ABd00004343sv*sd*bc*sc*i*
alias: pci:v000011ABd00004342sv*sd*bc*sc*i*
alias: pci:v000011ABd00004341sv*sd*bc*sc*i*
alias: pci:v000011ABd00004340sv*sd*bc*sc*i*
alias: pci:v00001186d00004B03sv*sd*bc*sc*i*
alias: pci:v00001186d00004B02sv*sd*bc*sc*i*
alias: pci:v00001186d00004001sv*sd*bc*sc*i*
alias: pci:v00001186d00004B00sv*sd*bc*sc*i*
alias: pci:v00001148d00009E00sv*sd*bc*sc*i*
alias: pci:v00001148d00009000sv*sd*bc*sc*i*
depends:
vermagic: 2.6.18-128.el5 SMP mod_unload gcc-4.1
parm: debug:Debug level (0=none,…,16=all) (int)
parm: copybreak:Receive copy threshold (int)
parm: disable_msi:Disable Message Signaled Interrupt (MSI) (int)
module_sig: 883f350497747d075ed35fe9471dce112f4410a0881510ca254558bada0e5e7ed1b641cbdc1cf0a0bca569a1a3cb1e27d68c7cb09d1b3aeb0d13f

也可以查看以加载的模块
[root@localhost mydisk]# lsmod
Module Size Used by
nfs 290189 1
lockd 99185 2 nfs
fscache 52385 1 nfs
nfs_acl 36673 1 nfs
autofs4 57033 2
hidp 83521 2
rfcomm 104809 0
l2cap 89281 10 hidp,rfcomm
bluetooth 118597 5 hidp,rfcomm,l2cap
sunrpc 197897 9 nfs,lockd,nfs_acl
ip_conntrack_netbios_ns 36033 0
ipt_REJECT 38849 1
xt_state 35265 2
ip_conntrack 91109 2 ip_conntrack_netbios_ns,xt_state
nfnetlink 40457 1 ip_conntrack
iptable_filter 36161 1
ip_tables 55329 1 iptable_filter
ip6t_REJECT 38849 1
xt_tcpudp 36289 10
ip6table_filter 36033 1
ip6_tables 50049 1 ip6table_filter
x_tables 50377 6 ipt_REJECT,xt_state,ip_tables,ip6t_REJECT,xt_tcpudp,ip6_tables
cpufreq_ondemand 42449 1
powernow_k8 58073 0
freq_table 40889 2 cpufreq_ondemand,powernow_k8
dm_mirror 53193 0
dm_multipath 55257 0
scsi_dh 41665 1 dm_multipath
video 53197 0
backlight 39873 1 video
sbs 49921 0
i2c_ec 38593 1 sbs
button 40545 0
battery 43849 0
asus_acpi 50917 0
acpi_memhotplug 40133 0
ac 38729 0
ipv6 424609 17 ip6t_REJECT
xfrm_nalgo 43333 1 ipv6
crypto_api 42945 1 xfrm_nalgo
lp 47121 0
joydev 43969 0
pcspkr 36289 0
snd_via82xx_modem 49229 0
shpchp 70765 0
sky2 78661 0
snd_via82xx 62825 1
snd_ac97_codec 143257 2 snd_via82xx_modem,snd_via82xx
ac97_bus 35649 1 snd_ac97_codec
snd_seq_dummy 37061 0
snd_seq_oss 65473 0
snd_seq_midi_event 41025 1 snd_seq_oss
snd_seq 87777 5 snd_seq_dummy,snd_seq_oss,snd_seq_midi_event
snd_pcm_oss 77377 0
snd_mixer_oss 49985 1 snd_pcm_oss
e100 70097 0
mii 38849 1 e100
snd_pcm 116681 4 snd_via82xx_modem,snd_via82xx,snd_ac97_codec,snd_pcm_oss
snd_timer 57161 2 snd_seq,snd_pcm
fglrx 2389864 26
snd_page_alloc 44113 3 snd_via82xx_modem,snd_via82xx,snd_pcm
i2c_viapro 42457 0
k8temp 39105 0
snd_mpu401 42985 0
snd_mpu401_uart 41921 2 snd_via82xx,snd_mpu401
snd_rawmidi 59713 1 snd_mpu401_uart
i2c_core 56129 2 i2c_ec,i2c_viapro
hwmon 36553 1 k8temp
snd_seq_device 41557 4 snd_seq_dummy,snd_seq_oss,snd_seq,snd_rawmidi
ns558 38593 0
parport_pc 62313 1
gameport 49745 3 snd_via82xx,ns558
parport 73165 2 lp,parport_pc
snd 99433 15 snd_via82xx_modem,snd_via82xx,snd_ac97_codec,snd_seq_oss,snd_seq,snd_pcm_oss,snd_mixer_oss,snd_pcm,snd_timer,snd_mpu401,snd_mpu401_uart,snd_rawmidi,snd_seq_device
soundcore 41825 1 snd
k8_edac 50693 0
edac_mc 60193 1 k8_edac
serio_raw 40517 0
dm_raid45 99025 0
dm_message 36161 1 dm_raid45
dm_region_hash 46145 1 dm_raid45
dm_log 44865 3 dm_mirror,dm_raid45,dm_region_hash
dm_mod 100369 4 dm_mirror,dm_multipath,dm_raid45,dm_log
dm_mem_cache 38977 1 dm_raid45
sata_via 44101 0
libata 208721 1 sata_via
sd_mod 56385 0
scsi_mod 196569 3 scsi_dh,libata,sd_mod
ext3 168017 2
jbd 94257 1 ext3
uhci_hcd 57433 0
ohci_hcd 55925 0
ehci_hcd 65741 0

4.编译网卡驱动
linux2.6.x以后的内核文件与关联函数放在/usr/src/kernels/版本/ 下,而老版本的linux默认在 /usr/src/linux中,所以做如下操作 ln -s /usr/src/kernels/版本/ /usr/src/linux

5.复制模块到/lib/modules/`uname -r`/kernel/drivers/net/
[root@localhost DriverInstall]# cp sk98lin.ko /lib/modules/`uname -r`/kernel/drivers/net/

6.分析所有模块,并建立关联
[root@localhost net]# depmod -a

7.确定模块是否加载
[root@localhost net]# lsmod|grep sk98lin
sk98lin 209340 0
应该是没有加载的,我这个显示是以加载的情况
加载模块
modprobe sk98lin

8.设置开机启动的网卡模块
/etc/modprobe.conf 2.4.x内核为/etc/modules.conf
修改或加放这一行
#alias eth0 sky2
alias eth0 sk98lin

内核模块加载就完成了,重启看看吧 sync;reboot

相关命令还有insmod,rmmod.

禁止开机自动加载模块相关文件
/lib/modules/`uname -r`/modules.dep
/etc/modprobe.d/*
/etc/modprobe.conf
/etc/rc.sysinit

ATI X1550 安装AMD驱动后 黑屏问题

修改/etc/X11/xorg.conf
Section "Monitor"
Identifier "aticonfig-Monitor[0]-0"
HorizSync 60.0 – 60.0 #加入这一行,为刷新率
HorizSync 60.0 – 60.0
Option "VendorName" "ATI Proprietary Driver"
Option "ModelName" "Generic Autodetecting Monitor"
Option "DPMS" "true"

Section "Screen"
Identifier "aticonfig-Screen[0]-0"
Device "aticonfig-Device[0]-0"
Monitor "aticonfig-Monitor[0]-0"
DefaultDepth 24
SubSection "Display"
Viewport 0 0
Depth 24
Modes "1440×900" #加入这一行,为你显示器的最佳分辨率
EndSubSection

或使用命令aticonfig –resolution=0,1440×900 (安装了ATI的官方驱动后才有)
下载地址:
https://a248.e.akamai.net/f/674/9206/0/www2.ati.com/drivers/linux/ati-driver-installer-9-3-x86.x86_64.run
注意:只有2.6.X的内核才能安装

显卡3D加速测试命令
[root@localhost ~]# fglrxinfo
display: :0.0 screen: 0
OpenGL vendor string: ATI Technologies Inc.
OpenGL renderer string: Radeon X1300/X1550 Series
OpenGL version string: 2.1.8543 Release
[root@localhost ~]# glxgears
15733 frames in 5.0 seconds = 3146.436 FPS
15033 frames in 5.0 seconds = 3006.294 FPS
X connection to :0.0 broken (explicit kill or server shutdown).

通过 网络安装 linux

必备服务:
1.DHCP服务
2.tftp服务
3.NFS服务或FTP或HTTP均可
(要求待安装电脑必需支持PXE启动)

配置步骤:
1.DHCP服务器的配置
[root@disk iso]# rpm -qa dhcp* #确定dhcp是否安装
dhcp-3.0pl1-23

[root@disk iso]# vi /etc/dhcpd.conf #我的dhcp配置(可通过rpm -ql dhcp找到范本)
#ddns-update-style interim;
ddns-update-style none; #不更新DDNS
ignore client-updates;
subnet 192.168.1.0 netmask 255.255.255.0 {

# — default gateway
option routers 192.168.1.1;
option subnet-mask 255.255.255.0;

# option nis-domain "domain.org";
# option domain-name "domain.org";
option domain-name-servers 202.106.46.151,202.106.196.115,202.106.0.20;

option time-offset -18000; # Eastern Standard Time
# option ntp-servers 192.168.1.1;
# option netbios-name-servers 192.168.1.1;
# — Selects point-to-point node (default is hybrid). Don't change this unless
# — you understand Netbios very well
# option netbios-node-type 2;

range dynamic-bootp 192.168.1.240 192.168.1.254;
default-lease-time 21600;
max-lease-time 43200;

# we want the nameserver to appear at a fixed address
group pxe {
filename "pxelinux.0";
host ns {
# next-server marvin.redhat.com;
next-server 192.168.1.51;
hardware ethernet 00:0c:29:96:93:05; #待安装电脑的MAC与IP的绑定
fixed-address 192.168.1.240;
}
}}

[root@disk iso]# vi /usr/share/doc/dhcp-3.0pl1/dhcpd.conf.sample
ddns-update-style interim;
ignore client-updates;
subnet 192.168.0.0 netmask 255.255.255.0 {
# — default gateway
option routers 192.168.0.1;
option subnet-mask 255.255.255.0;

option nis-domain "domain.org";
option domain-name "domain.org";
option domain-name-servers 192.168.1.1;

option time-offset -18000; # Eastern Standard Time
# option ntp-servers 192.168.1.1;
# option netbios-name-servers 192.168.1.1;
# — Selects point-to-point node (default is hybrid). Don't change this unless
# — you understand Netbios very well
# option netbios-node-type 2;

range dynamic-bootp 192.168.0.128 192.168.0.255;
default-lease-time 21600;
max-lease-time 43200;

# we want the nameserver to appear at a fixed address
host ns {
next-server marvin.redhat.com;
hardware ethernet 12:34:56:78:AB:CD;
fixed-address 207.175.42.254;
}
}

#如果有多个网卡
[root@disk iso]# cat /etc/sysconfig/dhcpd
# Command line options here
DHCPDARGS=“eth0”

#启动dhcp
[root@disk iso]# /etc/init.d/dhcpd start

#确定dhcp是否开机自动运行
[root@disk iso]# chkconfig –list |grep dhcp
dhcpd 0:关闭 1:关闭 2:关闭 3:启用 4:关闭 5:启用 6:关闭

2.tftp服务配置
[root@disk iso]# rpm -qa |grep tftp
tftp-0.32-4
tftp-server-0.32-4

安装
rpm -ivh tftp-server-0.32-4
rpm -ivh tftp-0.32-4

[root@disk iso]# cat /etc/xinetd.d/tftp
service tftp
{
disable = no
socket_type = dgram
protocol = udp
wait = yes
user = root
server = /usr/sbin/in.tftpd
server_args = -s /tftpboot -c
}
修改项server_args= -s <path> -c,其中<path>处可以改为你的tftp-server的根目录,参数-s指定chroot,-c指定了可以创建文件

3.NFS服务器配置
[root@disk /]# cat /etc/exports
/home/iso 192.168.1.0/24(rw,no_root_squash)
参数包括
rw:可读写
ro:只读
sync:同步写入
async:先暂存于内存中
no_root_squash:如果是root,则以root的权限访问
root_squash:如果是root,则压缩成匿名用户
all_squash:将所有登陆用户压缩成匿名用户
anonuid:将匿名者变为指定的uid
anongid:匿名者指定gid

#启动RPC与NFS(最好先关闭防火墙做测试)
/etc/init.d/portmap start
/etc/init.d/nfs start
确认是否正常
[root@disk /]# /etc/init.d/portmap status
portmap (pid 2024) 正在运行…
[root@disk /]# /etc/init.d/nfs status
rpc.mountd (pid 2425) 正在运行…
nfsd (pid 2417 2416 2415 2414 2413 2412 2411 2410) 正在运行…
rpc.rquotad (pid 2405) 正在运行…
#联机观察
[root@disk /]# showmount -a localhost
All mount points on localhost:
redhat.kumouse.com:/home/iso
[root@disk /]# showmount -e localhost
Export list for localhost:
/home/iso (everyone)
参数
-a 显示联机共享状态
-e 显示某主机的/etc/exports所共享的目录

设置NFS服务器的防火墙
[root@disk /]# cat /etc/sysconfig/nfs
MOUNTD_PORT="815"
#STATD_PORT=""
LOCKD_TCPPORT="2049"
LOCKD_UDPPORT="2049"
在/etc/sysconfig/iptables加入
-A RH-Firewall-1-INPUT -p tcp -s 192.168.1.0/24 -m multiport –dport 111,815,2049 -j ACCEPT
-A RH-Firewall-1-INPUT -p udp -s 192.168.1.0/24 -m multiport –dport 111,815,2049 -j ACCEPT
[root@disk /]#/etc/init.d/iptables restart

在别外一台linux主机上加载试试
[root@redhat mydisk]#mkdir /mydisk
[root@redhat mydisk]# mount -t nfs 192.168.1.200:/home/iso /mydisk
如果不输出信息,说明成功了,可以进去看看,看看是不是和/home/iso中的内容一样

关于NFS更详细的说明见:http://www.kumouse.com/article.asp?id=113

经过以上步骤服务器配置基本就完成了
4.将引导程序加入到TFTP的工作目录中(/etc/xinetd.d/tftp中写的server_args = -s /tftpboot -c)
#将光盘中/isolinux目录下的initrd.img与vmlinuz复制到/tftpboot中
[root@disk]#mkdir /mnt/iso
[root@disk]#mount -o loop,ro RHEL5-U2-i386-AS-disc1.iso /mnt/iso
[root@disk]#cp /mnt/iso/isolinux/initrd.img /tftpboot
[root@disk]#cp /mnt/iso/isolinux/vmlinuz /tftpboot
[root@disk]#mv /tftpboot/initrd.img /tftpboot/initrd-rhel5u2-i386.img
[root@disk]#mv /tftpboot/vmlinuz /tftpboot/vmlinuz-rhel5u2-i386
#将启动镜像文件pxelinux.0复制到/tftpboot中
[root@disk]#cp /usr/lib/syslinux/pxelinux.0 /tftpboot/
#编辑pxelinux.0的配置文件,所有的配置文件都放在启动服务器的/tftpboot/pxelinux.cfg/目录下
[root@disk /]# cat /tftpboot/pxelinux.cfg/default
default rhel5u2-i386
prompt 1
display pxelinux.cfg/list

label rhel5u2-i386
kernel vmlinuz-rhel5u2-i386
append initrd=initrd-rhel5u2-i386.img
label rhel5u2-i386-text
kernel vmlinuz-rhel5u2-i386
append initrd=initrd-rhel5u2-i386.img text

#我们将所有备选Red Hat Linux版本列在文件pxelinux.cfg/list中,它的内容会被pxelinux.0显示出来。

[root@disk /]# cat /tftpboot/pxelinux.cfg/list
Choose one of the following Linux distributions for your installation:
Name Distribution Arch. Installation media
————————————————————————-
rhel5u2-i386 RHEL 5 AS U2 i386 192.1

68.1.51:/home/iso/rhel5u2
rhel5u2-i386-text RHEL 5 AS U2 i386 192.168.1.51:/home/iso/rhel5u2

然后复制镜像文件到/home/iso中,就是nfs共享出来的目录,然后把待安装电脑改成网卡启动就可以安装了

选读:无人值守的安装
[root@bootserver ks]# more ks.cfg
# Kickstart file automatically generated by anaconda.
text 文本形式安装
install
nfs –server=192.168.1.51 –dir=/home/iso/rhel5u2 nfs方法安装
lang en_US.UTF-8
langsupport –default=en_US.UTF-8 en_US.UTF-8
keyboard us
#xconfig –card "S3 Savage/IX" –videoram 15168 –hsync 31.5-37.9 –vsync 50-70 –resolution 800×600 –depth 16 –startxonboot —

de
faultdesktop kde
network –device eth0 –bootproto dhcp
rootpw –iscrypted $1$e68iHGpw$/Qe4meNVXULikjCwDH26F1
firewall –disabled
selinux –disabled
authconfig –enableshadow –enablemd5
timezone Asia/Shanghai
bootloader –location=mbr
# The following is the partition information you requested
# Note that any partitions you deleted are not expressed
# here so unless you clear all partitions first, this is
# not guaranteed to work
#clearpart –all –initlabel
#part / –fstype ext2 –size=5000 分区格式可以根据自己的定义。 注释的话手工分区。分区后以下自动安装
#part swap –size=512
#part /data –fstype ext3 –size=1 –grow
%packages
@ admin-tools
@ editors
@ emacs
@ system-tools
@ legacy-network-server
@ dialup
@ ftp-server
@ network-server
@ compat-arch-support
@ legacy-software-development
@ server-cfg
@ development-tools
kernel-devel
e2fsprogs
kernel
pcmcia-cs
grub
%post

所有以"#"号开头的都是注释。

文件中的nfs –server=192.168.1.51 –dir=/home/iso/rhel5u2选项告诉安装程序:到服务器192.168.138.1的NFS共享目录/home/iso/rhel5u2下寻

找安装介质。Red Hat Linux安装程序足够聪明,可以识别该目录下应该被读取的ISO光盘镜像文件名,所有这里你不需要指定ISO文件名。

部署kickstart配置文件

首先我们需要把kickstart配置文件放在安装服务器上。我们把它放到/home/iso/rhel5u2/ks目录下。即该文件的NFS访问路径为:

nfs:192.168.1.51:/home/iso/rhel5u2/ks/ks.cfg

其次,我们需要让安装程序知道我们希望它用kickstart方式安装,并告知它可以从哪里获得kickstart配置文件。这可以通过给内核添加一个参

数"ks=kickstart配置文件路径"来实现。我们只需对启动服务器上的default文件做一些小修改就可以做到这点:

LABEL rhel5u2-i386
KERNEL vmlinuz-rhel5u2-i386
APPEND ks=nfs:192.168.1.51:/home/iso/rhel5u2/ks/ks.cfg initrd=initrd-rhel4u2-i386.img
ramdisk_size=8192

这样在启动安装程序的时候,参数ks=nfs:192.168.1.51:/home/iso/rhel5u2/ks/ks.cfg会被传递给它,告诉它使用这个文件作为kickstart配置文件

来进行kickstart安装。

Linksys WRH54G 刷 DD-WRT 小记

在上网无意中发现,我的路由原来也是很能大的(和tp的402M比,哈哈),居然人在刷DD-WRT成功.
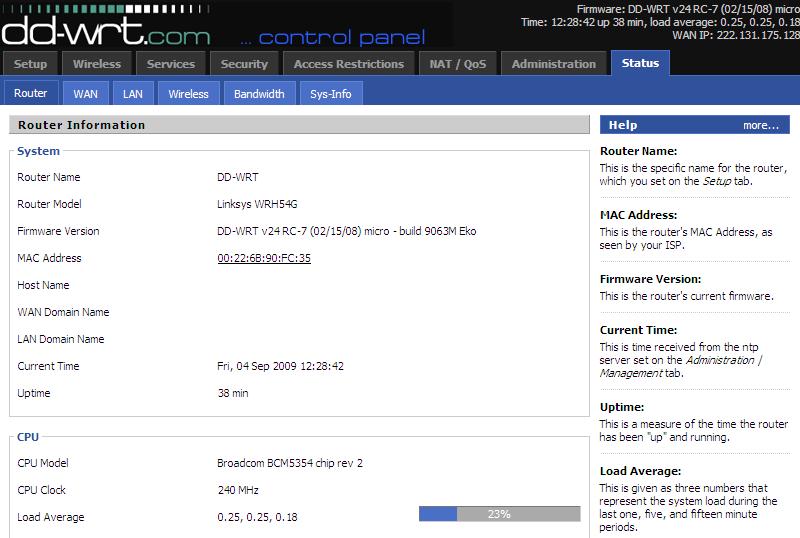
心中不安,我来试试,下载了新固件后,安全升级成功.上图
uploads/200909/04_124944_ddwrt.jpg

多了好多专业级路由的功能,其中比较有意思的,比如,无线中继(就是路由可以连接到别人的无线网,自己用)
还有QOS,不过番茄版的QOS更好,我这个刷不了,还有连接状态(看现在都谁在和你连接,有人功击你时就很有用),封P2P类的软件,由于是linux的内核,系统集成了相关功能插件.等无数功能,爽呆了.下面是改连接数的方法,telnet连接
DD-WRT v24 micro (c) 2008 NewMedia-NET GmbH
Release: 02/15/08 (SVN revision: 9063)

DD-WRT login: root
Password:
==========================================================

____ ___ __ ______ _____ ____ _ _
| _ | _ / / _ _ _| __ _|___ | || |
|| | || ||____ / / /| |_) || | / / __) | || |_
||_| ||_||_____ V V / | _ < | | V / / __/|__ _|
|___/|___/ _/_/ |_| _|_| _/ |_____| |_|

DD-WRT v24
http://www.dd-wrt.com

==========================================================

BusyBox v1.9.0 (2008-02-15 19:49:04 CET) built-in shell (ash)
Enter 'help' for a list of built-in commands.

u@h:w$ nv ^H^H^[[D^H^H
-sh: nv: not found
u@h:w$ nvram set ip_conntrack_max=4096
u@h:w$ nvram commit
nvram_commit(): end
u@h:w$

==========================================================

发现这个版本的固件有打不到某些网站的毛病,比如淘宝和新浪,双升级了一次固件
Router NameTP-LINK
Router ModelLinksys WRH54G
Firmware VersionDD-WRT v24-sp1 (07/27/08) micro – build 10012
现在好了,暂时还没发现问题

DOTA 互通 作弊 原理

Return Bug+GameCache的应用

一、排除泄露

在讲解完Return Bug的原理以及跟GameCache的简单应用后,我并没有进一步讲解更复杂的数据绑定,而是穿插讲了一篇中级教程《JASS动态注册事件》,因为在用Return Bug+GameCache写一些复杂的系统时,经常会用到动态注册事件。

但在讲解动态注册事件时,一个很重要的内容没有被提到,那就是排除在销毁触发器时由触发器条件和动作引起的泄露。不过在排泄时必须用到Return Bug+GameCache,因此我把排泄留到这章讲,当作Return Bug+GameCache的一个应用实例。

  好吧,让我们先回顾下动态注册事件,依旧用Tiveone的经典教程


jass: Copy code
//当触发注册的事件时调用的函数
function OnUnitAmort takes nothing returns nothing
//设置触发单位为无敌
call SetUnitInvulnerable( GetTriggerUnit(), true )
//破坏这个触发器,即下面的RegisterUnitAmortEvent所创建的触发器
//这样就不会导致该触发被多次调用,并且还能清理该触发所占用的内存
call DestroyTrigger(GetTriggeringTrigger())
endfunction

//注册模板
function RegisterUnitAmortEvent takes unit witchUnit returns nothing
//创建一个触发器
local trigger rTrg = CreateTrigger()
//为创建的触发器注册事件:当单位witchUnit的生命值小于或等于50的时触发事件
call TriggerRegisterUnitLifeEvent( rTrg , witchUnit, LESS_THAN_OR_EQUAL, 50 )
//注册触发器事件响应后所调用的函数
call TriggerAddAction( rTrg, function OnUnitAmort )
endfunction

这样的写法不是很好,它会造成内存泄露。我们来看下TriggerAddAction这个函数
native TriggerAddAction takes trigger whichTrigger, code actionFunc returns triggeraction

这里先生成了一个triggeraction,然后把它添加给了触发器;而当我们删除触发器的时候,这个triggeraction却并没有被删除。

那么,为了维护这世界的爱与正义,我们来排除上面动态注册事件的泄露吧~

首先,准备好下列Return Bug常用函数

jass: Copy code
function H2I takes handle h returns integer
return h
return 0
endfunction

function I2TG takes integer i returns trigger
return i
return null
endfunction

function I2TC takes integer i returns triggercondition
return i
return null
endfunction

function I2TA takes integer i returns triggeraction
return i
return null
endfunction

然后,上面的动态注册事件可以这样写

jass: Copy code
function RegisterUnitAmortAction takes nothing returns nothing
local trigger trg = GetTriggeringTrigger()
local triggeraction Act=I2TA(GetStoredInteger(udg_GC,I2S(H2I(trg)),"Triggeraction"))
call SetUnitInvulnerable(GetTriggerUnit(), true)
call TriggerRemoveAction(trg,Act)
call DestroyTrigger(trg)
call FlushStoredMission(udg_GC,I2S(H2I(trg)))
set trg = null
set Act=null
endfunction

function RegisterUnitAmortEvent takes unit witchUnit returns nothing
local trigger trg = CreateTrigger()
local triggeraction Act
call TriggerRegisterUnitStateEvent(trg, witchUnit, UNIT_STATE_LIFE, LESS_THAN_OR_EQUAL, 50)
set Act=TriggerAddAction(trg,function RegisterUnitAmortAction)
call StoreInteger(udg_GC,I2S(H2I(trg)),"Triggeraction ",H2I(Act))
set trg = null
set Act=null
endfunction

在这里,我们定义了一个触发器动作变量Act,用它来保存生成的触发器,然后把它删除;大家是不是觉得这种方法似曾相识呢——以前我们排除点泄露的时候,也是用个点变量来保存生存的点,之后再清除这个变量保存的点。在删除点时,我们使用 RemoveLocation( )函数;而删除触发器条件或动作,我们使用TriggerRemoveCondition()和TriggerAddAction()这两个函数。(至于TriggerClearActions()和TriggerClearConditions()这两个函数,老狼说是废函数,“相当于把垃圾扫床底下”,那我们就不去理会它们吧。)

触发器条件和动作的清除的确比较麻烦,不过大家可以采用老狼写的两个删除触发器自定义函数:

jass: Copy code
function DestroyTriggerAllById takes integer t returns nothing
call TriggerRemoveCondition(I2TG(t),I2TC(GetStoredInteger (udg_GC,I2S(t),"TriggerCondition")))
call DestroyTrigger(I2TG(t))
call FlushStoredMission(udg_GC,I2S(t))
endfunction

function DestroyTriggerAll takes trigger trg returns nothing
call TriggerRemoveCondition(trg,I2TC(GetStoredInteger(udg_GC,I2S(H2I(trg)),"TriggerCondition")))
call DestroyTrigger(trg)
call FlushStoredMission(udg_GC,I2S(H2I(trg)))
endfunction
//========================================================
function RegisterUnitAmortCond takes nothing returns nothing
call SetUnitInvulnerable(GetTriggerUnit(), true)
call DestroyTriggerAll(GetTriggeringTrigger())
endfunction

function RegisterUnitAmortEvent takes unit witchUnit returns nothing
local trigger trg = CreateTrigger()
call TriggerRegisterUnitStateEvent(trg, witchUnit, UNIT_STATE_LIFE, LESS_THAN_OR_EQUAL, 50)
call StoreInteger(udg_GC,I2S(H2I(trg)),"TriggerCondition",H2I (TriggerAddCondition(trg,Condition(function RegisterUnitAmortCond))))
set trg = null
endfunction

老狼把触发器动作里的内容写到了条件里,为什么这样写大家可以去搜索教程,这里就不赘述了。这里DestroyTriggerAll()和DestroyTriggerAllById()两个函数区别仅仅在于一个传递触发器类型参数,一个传递整数类型参数(这里的整数参数是通过H2I(trg)得到的) ,大家按自己写JASS的习惯,选择其中一个来使用就可以了。此外,为了详细讲解步骤,我定义了Act这个触发器动作变量,但实际写代码时,可以像老狼那样省略这个中间变量,直接把数据存入缓存。
大家不妨以老狼这段代码,作为动态注册事件的模板。

二、缓存的使用

在之前讲解缓存时,我曾说Return Bug改变了GameCache的命运,发掘了GameCache的潜力;那么GameCache究竟强大在哪里。此外,当被问到什么是GameCache,高手们往往会回答,“一个数据库”、“一个仓库”。GameCache是如何担当存储数据的重任呢,我们不妨看下GameCache与全局变量的对比。

1.单个变量

我们要储存一个单位,比如everguo,

数据
GameCache
全局变量

Everguo(单位)
StoreInteger(udg_GC,”Handsome”,”Everguo”,H2I(Everuo))
Set Handsome=Everguo

(Handsome为单位型全局变量)

2.数组

数据
GameCache
全局变量

1 Everguo

2 汤姆.汗克斯

3 莱昂纳多

StoreInteger(udg_GC,”Handsome”,”1”,H2I(Everuo))

StoreInteger(udg_GC,”Handsome”,”2”,H2I(汤姆.汗克斯))

StoreInteger(udg_GC,”Handsome”,”3”,H2I(莱昂纳多))

Set Handsome[1]=Everguo

Set Handsome[2]=汤姆.汗克斯

Set Handsome[3]=莱昂纳多

(Handsome为单位型全局变量数组)

3.多个数组

数据
GameCache
全局变量

1
2
StoreInteger(udg_GC,”Handsome”,”1”,H2I(Everuo))

StoreInteger(udg_GC,”Handsome”,”2”,H2I(汤姆.汗克斯))

StoreInteger(udg_GC,”Handsome”,”3”,H2I(莱昂纳多))

StoreInteger(udg_GC,”SeLang”,”1”,H2I(Red_Wolf))

StoreInteger(udg_GC,”SeLang”,”2”,H2I(幽灵狼))

StoreInteger(udg_GC,”SeLang”,”3”,H2I(田伯光))

Set Handsome[1]=Everguo

Set Handsome[2]=汤姆.汗克斯

Set Handsome[3]=莱昂纳多

Set SeLang[1]= Red_Wolf

Set SeLang[2]= 幽灵狼

Set SeLang[3]= 田伯光

(Handsome、SeLang均为单位型全局变量数组)

1 Everguo

2 汤姆.汗克斯

3 莱昂纳多

1 Red_Wolf

2 幽灵狼

3 田伯光

以上是GameCache和全局变量在储存数据上的对比,看上去GameCache储存数据比全局变量繁琐得多;不知大家注意到没有,GameCache跟全局变量相比有个最大的优点——能动态地生成数据库。

比如,在游戏开始后,我们想再储存如下人妖排行榜:

1 东方不败

2 李宇春

3 看帖不回的

用GameCache能轻易做到

jass: Copy code
StoreInteger(udg_GC,”RY”,”1”,H2I(东方不败))

StoreInteger(udg_GC,”RY”,”2”,H2I(李宇春))

StoreInteger(udg_GC,”RY”,”3”,H2I(看帖不回的))

但用全局变量却做不到,除非我们一开始就定义了“RY”这个单位型全局变量数组。

回想起来,之前我们为什么说JASS不能用T替代,因为Return Bug+GameCache在T里无法做到。比如,在上文排除触发器泄露中,call StoreInteger(udg_GC,I2S(H2I(trg)),"Triggeraction ",H2I(Act)),如果把这条语句用全局变量来写,那么我们必须事先定义好一个触发器动作型全局变量数组;如果我们想用全局变量绑定数据,那得预先定义海量的全局变量数组。

此外,GameCache的灵活性也是无可替代,以下是上次教程讲解Return Bug+GameCache绑定数据时提到例子

jass: Copy code
function ManData takes unit man,integer stature,integer avoirdupois returns nothing
call StoreInteger(udg_GC,I2S(H2I(man)),"stature",stature)
call StoreInterger(udg_GC,I2S(H2I(man)),"avoirdupois",avoirdupois)
endfunction

然后

jass: Copy code
call ManData(Lucy,165,45)
call ManData(Jack,172,60)

将数据输入。可以看出,只需预先写个系统(比如上文的ManData函数) ,然后再向缓存写入数据就非常方便而且一目了然。

那么,用全局变量的话,如何做到呢

set stature[1]=165
set stature[2]=172
set avoirdupois[1]=45
set avoirdupois[2]=65

首先定义了stature和avoirdupois这两个全局变量数组后,我们还必须有惊人的记忆力,记住数组方括号内的数字对应的单位——这里1对应Lucy,2对应Jack,如果单位多了将很难区分;而缓存在记录数据时,是以字符窜为标识,很形象,比如我们称呼一个人,是称呼“9527”呢,还是“华安”。
缓存与全局变量数组的区别就在于此,它们各有优缺点。缓存以字符窜为标识,存储数据,这在我们写代码的时候能一目了然;但这也正是它的缺点,写入和读出数据速度比较慢。全局变量数组虽然不形象,难记忆,但效率高。
在这里还是向大家推荐缓存,虽然它效率不如全局变量高,但在游戏中差别不大;我们也没必要为提高一点点效率而牺牲代码的可读性。

此外,GameCache还可储存二维数组,比如上文的三个排行榜:

排行榜

排名

1
2
3

1
Everguo
Red_Wolf
东方不败

2
汤姆.汗克斯
幽灵狼
李宇春

3
莱昂纳多
田伯光
看帖不回的

把上面数据写入

jass: Copy code
StoreInteger(udg_GC,”1”,”1”,H2I(Everuo))
StoreInteger(udg_GC,”1”,”2”,H2I(汤姆.汗克斯))
StoreInteger(udg_GC,”1”,”3”,H2I(莱昂纳多))
StoreInteger(udg_GC,”2”,”1”,H2I(Red_Wolf))
StoreInteger(udg_GC,”2”,”2”,H2I(幽灵狼))
StoreInteger(udg_GC,”2”,”3”,H2I(田伯光))
StoreInteger(udg_GC,”3”,”1”,H2I(东方不败))
StoreInteger(udg_GC,”3”,”2”,H2I(李宇春))
StoreInteger(udg_GC,”3”,”3”,H2I(看帖不回的))

然后我们写个函数方便查找数据

jass: Copy code
function UnitData takes integer x,integer y returns unit
return I2U(GetStoredInteger(udg_GC,I2S(x),I2S(y)))
endfunction

如果我们想调用这个二维数组(2,2)对应的单位,只需set unit=UnitData(2,2),就把幽灵狼赋值给了unit。

在T中只有一维数组,因此在处理很多问题时极不方便。而在使用GameCache后,我们可以StoreInteger(udg_GC,I2S(H2I(xx)), I2S(H2I(xx)),H2I(xx))或是GetStoredXXXX(udg_GC,I2S(H2I(xx)),I2S(H2I(xx))),要多方便有多方便。

或许此刻你已经在心中呐喊“Return Bug+GameCache”实在是太YD了,的确,我以前就把他们比喻成奸夫淫妇来着~

不得不说,Return Bug+GameCache改变了WEer写代码的思维,灵活地运用它们我们可以写出很多实用的系统。
或许上面关于Return Bug+GameCache替代全局变量存储数据的例子你不是很懂,不要紧,看完下面的演示你将对Return Bug+GameCache的使用有更清晰的认识。

三.Return bug+GameCache+JASS动态注册事件实例

演示永远是最好的教程。那么,在学习了JASS动态注册事件,以及用Return bug+GameCache存储数据后,我们来看个实例。
大多数RPG地图都有这样的T——“当单位进入XX区域,立刻移动单位到XX区域”,比如常见的进洞,当英雄进入洞口,立刻被传送到洞内,再从洞内的出口出来。下面是我写的一个3C地图的进洞函数。

jass: Copy code

function H2I takes handle h returns integer
return h
return 0
endfunction
function I2U takes integer i returns unit
return i
return null
endfunction

function Trig_RectUnitMove_Conditions takes nothing returns boolean
local unit hero = GetTriggerUnit() //获得触发单位
local trigger trig = GetTriggeringTrigger() //获得当前触发
local player P = GetOwningPlayer(hero)
local real x = GetStoredReal(udg_GC,I2S(H2I(trig)),"RectUnitMoveX") //从缓存中读出目标区域中心的X坐标
local real y = GetStoredReal(udg_GC,I2S(H2I(trig)),"RectUnitMoveY") //从缓存中读出目标区域中心的Y坐标
local integer level = GetStoredInteger(udg_GC,I2S(H2I(trig)),"RectUnitMoveLevel") //从缓存中读出英雄等级限制
local integer i=0
if IsUnitType(hero, UNIT_TYPE_HERO) != true or (GetPlayerId(P)>11) then //如果触发单位不是英雄,或触发玩家是中立玩家
set hero=null
set

trig=null
return false //直接返回,不执行下面的动作
endif
set i = GetHeroLevel(hero) //获得英雄等级
if i<level then
call DisplayTimedTextToPlayer(GetLocalPlayer(), 0, 0, 10, "英雄等级未满"+I2S(level)+"级,不能进入")
//英雄等级不够,不能进洞
else
call SetUnitX(hero,x)
call SetUnitY(hero,y) //移动英雄到目标区域中心
call PanCameraToTimedForPlayer(P,x,y,0) //镜头跟随
call IssueImmediateOrderById(hero,OrderId("stop"))
//由于用坐标函数移动单位,单位当前状态不变,因此进洞后会继续移动,所以得让它停下来
endif
set hero=null
set trig=null
return false
endfunction

function RectUnitMoveTrigger takes integer level,rect r1,rect r2 returns nothing
local real x = GetRectCenterX(r2) //获得目标区域中心的X坐标
local real y = GetRectCenterY(r2) //获得目标区域中心的Y坐标
local trigger trig=CreateTrigger()
call StoreReal(udg_GC,I2S(H2I(trig)),"RectUnitMoveX",x) // 储存目标区域中心的X坐标
call StoreReal(udg_GC,I2S(H2I(trig)),"RectUnitMoveY",y) // 储存目标区域中心的Y坐标
call StoreInteger(udg_GC,I2S(H2I(trig)),"RectUnitMoveLevel",level) //存储英雄等级限制
call TriggerRegisterEnterRectSimple( trig, r1 ) //以单位进入指定区域为事件
call TriggerAddCondition(trig,Condition(function Trig_RectUnitMove_Conditions)) //添加条件
set trig = null
endfunction

上面是个很简单的Return bug+GameCache+JASS动态注册事件运用的例子,在学习了前面Return bug原理教程的朋友很容易能看懂,需要说明的是,这里使用Return bug+GameCache绑定数据,没用把目标区域(r2)中心坐标和等级限制绑定在指定区域(r1),而是绑定在了新生成的触发器(trig)上,因为我们可以通过GetTriggeringTrigger()来得到当前的触发,却不能得到当前英雄所在的区域(r1)。此外,我们在绑定数据的时候,除了触发器,一般是跟单位或计时器绑定,然后通过GetTriggerUnit()和GetExpiredTimer()分别获得单位和计时器,然后从单位和计时器上读出预先绑定的数据。
从上文的例子可以看出,我们先把目标区域中心的坐标写到缓存里,保存在“I2S(H2I(trig))”下,然后通过local trigger trig = GetTriggeringTrigger()来获得当前触发,用GetStoredReal(udg_GC,I2S(H2I(trig)),"XXXXXX")来读出数据。(原理我就不复述了,参看前面Return bug原理教程。)
(给十分钟,好好看下这段代码。)
相信你已经明白了,所谓的数据绑定,无非是把数据用Return bug+GameCache把数据存储到缓存中“XXX”的类别名下(这里的类别“XXX”,大都是通过I2S(H2I())将触发器、单位和计时器转换得来的),然后在按上文的方法从缓存读出来。
那么,我们为何要称这方法为数据绑定呢?
在讲解Return bug原理的时候,我曾提了两种存储数据的方法,一是上文的以I2S(H2I())转化的handle类参数为类别名,如

jass: Copy code
call StoreReal(udg_GC,I2S(H2I(trig)),"RectUnitMoveX",x)
call StoreReal(udg_GC,I2S(H2I(trig)),"RectUnitMoveY",y)
call StoreInteger(udg_GC,I2S(H2I(trig)),"RectUnitMoveLevel",level)

一是以I2S(H2I())转化的handle类参数为缓存项目名

jass: Copy code
call StoreReal(udg_GC,"RectUnitMoveX",I2S(H2I(trig)),x)
call StoreReal(udg_GC,"RectUnitMoveY",I2S(H2I(trig)),y)
call StoreInteger(udg_GC,"RectUnitMoveLevel",I2S(H2I(trig)),level)

我曾说,第二种方法,不合我们的习惯,为何?
比如,我们希望这个触发器在运行后自动销毁,此时我们应当将缓存中的数据也清除掉。
以I2S(H2I())转化的handle类参数为类别名的清除缓存数据

jass: Copy code
call FlushStoredMission(udg_GC,I2S(H2I(trig)))

以I2S(H2I())转化的handle类参数为缓存项目名的清除缓存数据

jass: Copy code
FlushStoredReal(udg_GC,"RectUnitMoveX",I2S(H2I(trig)))
FlushStoredReal(udg_GC,"RectUnitMoveY",I2S(H2I(trig)))
FlushStoredInteger(udg_GC,"RectUnitMoveLevel",I2S(H2I(trig)))

比较上面两种方法,大家应该明白了为何我们要以I2S(H2I())转化的handle类参数为类别名了吧。用这种方法,可以很容易的把数据与handle类参数挂钩,也可很容易地清除,因此我们称呼这种方法为数据绑定。

当我们把数据绑定到一个单位上,比如以前那个仿暗黑佣兵系统,当单位嗝屁后,可以把与它相关的数据清理掉,释放内存;把数据绑定在触发器上,比如那个环绕函数模板,当环绕时间到了或是释放技能的英雄挂了后,要立刻销毁计时器,同时清空缓存;在前面讲解动态注册事件排泄时,我们看到了,在删除触发器后,也有清除缓存数据的语句。
这便是数据绑定,也是JASS强大所在;为了让大家印象深刻,我再举个例子。

如果我们想只让特定类型单位进入区域才触发事件,比如3C里羊进圈选英雄,那么我们只需修改下上面的代码

jass: Copy code

function Trig_WC_Conditions takes nothing returns boolean
local unit hero = GetTriggerUnit() //获得触发单位
local trigger trig = GetTriggeringTrigger() //获得当前触发
local player P = GetOwningPlayer(hero)
local real x = GetStoredReal(udg_GC,I2S(H2I(trig)),"RectUnitMoveX") //从缓存中读出目标区域中心的X坐标
local real y = GetStoredReal(udg_GC,I2S(H2I(trig)),"RectUnitMoveY") //从缓存中读出目标区域中心的Y坐标
local integer WCuid = GetStoredInteger(udg_GC,I2S(H2I(trig)),"WCuid") //从缓存中读出指定单位类型
local integer uid=GetUnitTypeId(hero)
local string s=GetStoredString(udg_GC,I2S(H2I(trig)),"String")
if WCuid!=uid then
call DisplayTimedTextToPlayer(GetLocalPlayer(), 0, 0, 10, s) //与指定单位类型不匹配,不能入内
else
call SetUnitX(hero,x)
call SetUnitY(hero,y) //移动单位到目标区域中心
call PanCameraToTimedForPlayer(P,x,y,0) //镜头跟随
call IssueImmediateOrderById(hero,OrderId("stop"))
//由于用坐标函数移动单位,单位当前状态不变,因此进洞后会继续移动,所以得让它停下来
endif
set hero=null
set trig=null
return false
endfunction

function WCMoveTrigger takes integer uid,rect r1,rect r2,string s returns nothing
local real x = GetRectCenterX(r2) //获得目标区域中心的X坐标
local real y = GetRectCenterY(r2) //获得目标区域中心的Y坐标
local trigger trig=CreateTrigger()
call StoreReal(ud

g_GC,I2S(H2I(trig)),"RectUnitMoveX",x) // 储存目标区域中心的X坐标
call StoreReal(udg_GC,I2S(H2I(trig)),"RectUnitMoveY",y) // 储存目标区域中心的Y坐标
call StoreInteger(udg_GC,I2S(H2I(trig)),"WCuid",uid) //存储进入区域单位类型
call StoreString(udg_GC,I2S(H2I(trig)),"string",s) //存储提示文字
call TriggerRegisterEnterRectSimple( trig, r1 ) //以单位进入指定区域为事件
call TriggerAddCondition(trig,Condition(function Trig_WC_Conditions)) //添加条件
set trig = null
endfunction

上面代码使以单位类型判断替换英雄等级判断,只有特定单位才能进入区域;类似地,你也可以加入单位判断,只有XX单位才能进入,比如“只有FRJJ才能进入看帖不回的人的房间”,只需StoreReal(udg_GC,I2S(H2I(trig)),"Lover",FRJJ),然后比较触发单位是不是FRJJ,这里就不把演示写出来了。

相信通过上面的例子,你已经对Return bug+GameCache有一定了解了,但那是不够的,在下次的教程,我将讲解如何用Return bug+GameCache做更复杂的系统和演示。

BCC工具的使用:
1. 运行bcc.bat
2. 然后将你修改过的地图中的J文件和原正常地图中的J文件复制到软件目录, 比如我的修改过的地图名为 war3map.j 原始未修改的J文件为 war3map_o.j.
3. 在命令行敲入 bcc war3map_o.j war3map.j 如果提示" 恭喜, 生成成功"字样时则为成功, 软件目录中会生成一个new_war3map.j文件,将这个new_war3map.j重命名为war3map.j替换正版地图中的J文件即可.

功能:
1. 可以使作弊地图拥有和正规地图相同的HASH值. 即你使用的是作弊图, 而主机使用的是正规图, 你不会因为地图不同而下载地图.

注意: J文件并不是所有东西都可以改, 引用 Sc2DotA.CoM 的 Thewisp (目前的57c作弊版作者) 一段话:

凡是实体数据都不能改,例如触发,timer,等等所有类型为handle的东西

整数,实数,boolean,字符串等都可以,此外缓存也可以操作。

原理是把缓存单方修改后,用sync系列函数把数据扩散出去,因此他就是合法数据了

点击下载
win 2008 自动 多网卡 负载 带宽叠加

用了几个月windows2008 server 了,今天有个新发现,原来xp中,如果你有双线接入,并正确设置了ip,xp系统也只会选择一条线路来用,但是2008就不同了,2008有NLB,也就是说如果你有多条链路,他会一起来用,下面是只启用了一条线路
uploads/200908/26_151151_1.jpg

下面是启用了一个局域网和一个无线网之后的情况

uploads/200908/26_151313_2.jpg
uploads/200908/26_151318_4.jpg

刚刚入手 威盛EPIA-933AFIC17*17 MINI 主板

型号.Epia-933AFIC VIA OEM给iiyama的.
尺寸16.9CMx16.9CM
整夜不关机下载服务器的首选.非常低能耗.
主板内嵌带VIA C3 933 Mhz CPU
带声卡网卡显卡USB等.一个PCI slot.2个SD内存插槽.
这东西十分省电哟,具体有多省,这机子全套满载也就40W
如果当路由用也就15W

Via Epia系列的功率计算器http://www.mini-box.com/site/mb/Power_MB.htm

bash 文件处理操作工具总结

bash 文件处理操作工具总结

1 常用过滤器
1.1 tr
可以把tr看成是sed的一个简化版本,它可以用一个字符来替换另一个字符,或者去除一些字符。也可以用来去除重复字符。tr主要用于删除文件中控制字符或进行字符转换。语法:
tr -c -d -s ["string1_to_translate_from"] ["string2_to_translate_to"] < input-file>
-c 用字符串1中字符集的补集替换此字符集,要求字符集为ASCII。
-d 删除字符串1中所有输入字符。
-s 删除所有重复出现字符序列,只保留第一个;即将重复出现字符串压缩为一个字符串。
字符范围
指定字符串1或字符串2的内容时,只能使用单字符或字符串范围或列表。
[a-z] a-z内的字符组成的字符串。
[A-Z] A-Z内的字符组成的字符串。
[0-9] 数字串。
octal 一个三位的八进制数,对应有效的ASCII字符。
[O*n] 表示字符O重复出现指定次数n。因此[O*2]匹配OO的字符串。
tr中特定控制字符的不同表达方式
速记符含义八进制方式
a Ctrl-G 铃声07
b Ctrl-H 退格符10
f Ctrl-L 走行换页14
n Ctrl-J 新行12
r Ctrl-M 回车15
t Ctrl-I tab键11
v Ctrl-X 30
例1:删除文件中重复的小写字母,双引号是必须的
[root@redhat test]# cat new
aaabbbZZZBBBcccDDD
abcabcabcAABBCC
[root@redhat test]# cat new|tr -s "[a-z]"
abZZZBBBcDDD
abcabcabcAABBCC

例2:删除空行
[root@redhat test]# cat new
aaabbbZZZBBBcccDDD

abcabcabcAABBCC
[root@redhat test]# tr -s "[12]"<new
aaabbbZZZBBBcccDDD
abcabcabcAABBCC

例3:将大写转成小写
[root@redhat test]# tr "[A-Z]" "[a-z]"<new
aaabbbzzzbbbcccddd

abcabcabcaabbcc

例4:将字母以外的字符转换成新行,并删除重复的
[root@redhat test]# cat new
aa1ab3bbZ4ZZB5B676BcccDDD
567456234234
23423425
abcabcabcAABBCC
[root@redhat test]# tr -cs "[A-Za-z]" "[n*]"<new
aa
ab
bbZ
ZZB
B
BcccDDD
abcabcabcAABBCC
如果把-s去掉重复行去掉,就会成这个样子
[root@redhat test]# tr -c "[A-Za-z]" "[n*]"<new
aa
ab
bbZ
ZZB
B

BcccDDD

abcabcabcAABBCC

例5:把/etc/passwd中的:换成TAB
[root@redhat test]# tr "[:]" "t" </etc/passwd
root x 0 0 root /root /bin/bash
bin x 1 1 bin /bin /sbin/nologin
daemon x 2 2 daemon /sbin /sbin/nologin
adm x 3 4 adm /var/adm /sbin/nologin
lp x 4 7 lp /var/spool/lpd /sbin/nologin
sync x 5 0 sync /sbin /bin/sync
…..

例6:使内容更具可读性
[root@redhat test]# echo $PATH | tr ":" "n"
/usr/local/sbin
/usr/local/bin
/sbin
/bin
/usr/sbin
/usr/bin
/usr/X11R6/bin
/root/bin
/root/Testsh

例7:在vi 中使用
1,$!tr -d 'a'

1.2 wc 显示行数,单词数,字节数,字符数
参数:
–byte    -c  仅仅显示输入中的字节数
–lines    -l  仅仅显示输入中的行数
–max-line-length  -L  显示输入中最长的行的长度
–chars    -m  仅仅显示输入中的字符数
–words    -w  仅仅显示输入中的单词数
一个单词是指由空格,TAB,换行或它们的混合分隔限定的一系列字符。
1.3 uniq 显示唯一的行
语法:uniq [options][input-file][output-lile]
–count  -c  在行首显示该行在输入文件中出现的次数
–repeated  -d  显示一次重复出现的行,不显示没有重复出现的行
–skip-fields=nfield    -f nfield  忽略每行的前n个邮空白字符分隔出的字段
–ignore-case  -i  比较行时忽略字符大小写
–skip-chars=nchar    -s nchar  忽略每行的前n个字符。如果同时使用了–skip-nfields选项,uniq将忽略行首的n个字段以及它们后面的n个字符。可以使用该选项来忽略字段打头的空白字符
–unique  -u  仅显示那些没有重复出现的行
–check-chars=nchar  -w nchar  在应用-f 与-s选项之后,一共比较行中n个字符。默认情况下uniq将比较整行。
例:
[root@redhat test]# cat 98
i am zb
i am zb
i am zb
fuck you
he is sb
he is sb
he is sb
he is sb
he is sb
he is sb
he is sb
[root@redhat test]# uniq 98
i am zb
fuck you
he is sb
#去掉重复出现的行
[root@redhat test]# uniq -d 98
i am zb
he is sb
#显示一次重复出现的行,没重复的不显示
[root@redhat test]# uniq -u 98
fuck you
#仅显示不重复的行
[root@redhat test]# uniq -c 98
3 i am zb
1 fuck you
7 he is sb
#只显示一次重复出现的行,并统计出数次数

1.4  grep 在文件中搜索模式
语法:grep [options] pattern [file-list]
主要选项
-E  可使用扩展正则表达式与egrep相同
-F  解释为固定的字符串,与fgrep同
-G  解释为基本正则表达式。默认值
其它选项
–count  -c  只显示每个文件中包含匹配的行的数目
–context    -Cn  对每个匹配的行显示n行上下文
–file=file    -f file  该文件中每行都包含一个模式,从输入中找匹配每个模式的行
–no-filename    -h  当搜索多个文件时,在每行的开始不显示文件名
–ignore-case  -i  忽略大小写
–files-with-matches  -l  仅显示包含匹配的文件名,仅显示一次
–max-count=n  -m n    显示包含匹配的n行后停止读取文件或标准输入
–line-number    -n  在显示的每行前显示行号
–quiet  -q  不发送任何内容到标准输出,仅设置退出代码
–recursive  -r或-R  递归处理目录中的所有文件
–no-message    -s  如果文件不存在或不可读,不显示错误消息
–invert-match    -v  显示不包含匹配的行,反选
–word-regxp    -w  必须匹配整个字
–line-regxp    -x  必须匹配整行

1.5 sort 对文件排序或合并
语法:sort [options][file-list]
-b  忽略行开头的空格或TAB
-c  检查文件是否被恰当地排序。如以已排好则不显示任何消息,否则返回退出状态为1
-d  忽略除字母数字和空白符外的所有其他字符。例如标点符号
-f  将所有小写字母看作是大写字母进行比较。
-i  忽略所有的非打印字符
-k start[,stop]  按指定的排序字段进行排序
-m  如输入多个文件,不检查文件是否排好序而直接将它们全并起来
-n  按算术序列排序
-o filename  将输出发送到filename,filename可以是file-li

st中某个文件
-r  按逆序排列
-t x  指定字段分隔符为x
-u  对重复行仅输出一次
例1:
[root@redhat Testsh]# cat cars
plym fury 1970 73 2500
chevy malibu 1990 60 3000
ford mustang 1965 45 10000
volvo s80 1998 102 9850
ford thundbd 2003 15 10500
chevy malibu 2000 50 3500
bmw 325i 1985 115 450
honda accord 2001 30 6000
ford taurus 2004 10 17000
toyota rav4 2002 180 750
chevy impata 1985 85 1550
ford explor 2003 25 9500
[root@redhat Testsh]# sort -n -k5 cars
bmw 325i 1985 115 450
toyota rav4 2002 180 750
chevy impata 1985 85 1550
plym fury 1970 73 2500
chevy malibu 1990 60 3000
chevy malibu 2000 50 3500
honda accord 2001 30 6000
ford explor 2003 25 9500
volvo s80 1998 102 9850
ford mustang 1965 45 10000
ford thundbd 2003 15 10500
ford taurus 2004 10 17000
按数字方式给第5个字段从小到大排序

例2:
[root@redhat Testsh]# sort -t ":" -k3 -nr /etc/passwd
nfsnobody:x:65534:65534:Anonymous NFS User:/var/lib/nfs:/sbin/nologin
root5:x:559:0:shashijie:/home/root:/bin/bash
root4:x:558:0:shashijie:/home/root:/bin/bash
root3:x:557:0:shashijie:/home/root:/bin/bash
root2:x:556:0:shashijie:/home/root:/bin/bash
root1:x:555:0:shashijie:/home/root:/bin/bash
ssj5:x:554:554:shashijie:/home/ssj:/bin/bash
ssj4:x:553:553:shashijie:/home/ssj:/bin/bash
ssj3:x:552:552:shashijie:/home/ssj:/bin/bash
ssj2:x:551:551:shashijie:/home/ssj:/bin/bash
ssj1:x:550:550:what,beijing,12345678,123123:/home/ssj:/bin/bash
test1:x:501:501:testmod:/home/test1:/bin/bash
ssj:x:500:500:shashijie:/home/ssj:/bin/bash
nobody:x:99:99:Nobody:/:/sbin/nologin
desktop:x:80:80:desktop:/var/lib/menu/kde:/sbin/nologin
pcap:x:77:77::/var/arpwatch:/sbin/nologin
sshd:x:74:74:Privilege-separated SSH:/var/empty/sshd:/sbin/nologin
vcsa:x:69:69:virtual console memory owner:/dev:/sbin/nologin
webalizer:x:67:67:Webalizer:/var/www/html/usage:/sbin/nologin
smmsp:x:51:51::/var/spool/mqueue:/sbin/nologin
apache:x:48:48:Apache:/var/www:/sbin/nologin
mailnull:x:47:47::/var/spool/mqueue:/sbin/nologin
xfs:x:43:43:X Font Server:/etc/X11/fs:/sbin/nologin
gdm:x:42:42::/var/gdm:/sbin/nologin
ntp:x:38:38::/etc/ntp:/sbin/nologin
rpm:x:37:37::/var/lib/rpm:/bin/bash
rpc:x:32:32:Portmapper RPC user:/:/sbin/nologin
rpcuser:x:29:29:RPC Service User:/var/lib/nfs:/sbin/nologin
nscd:x:28:28:NSCD Daemon:/:/sbin/nologin
postgres:x:26:26:PostgreSQL Server:/var/lib/pgsql:/bin/bash
named:x:25:25:Named:/var/named:/sbin/nologin
squid:x:23:23::/var/spool/squid:/sbin/nologin
ftp:x:14:50:FTP User:/var/ftp:/sbin/nologin
gopher:x:13:30:gopher:/var/gopher:/sbin/nologin
games:x:12:100:games:/usr/games:/sbin/nologin
operator:x:11:0:operator:/root:/sbin/nologin
uucp:x:10:14:uucp:/var/spool/uucp:/sbin/nologin
news:x:9:13:news:/etc/news:
mail:x:8:12:mail:/var/spool/mail:/sbin/nologin
halt:x:7:0:halt:/sbin:/sbin/halt
shutdown:x:6:0:shutdown:/sbin:/sbin/shutdown
sync:x:5:0:sync:/sbin:/bin/sync
lp:x:4:7:lp:/var/spool/lpd:/sbin/nologin
adm:x:3:4:adm:/var/adm:/sbin/nologin
daemon:x:2:2:daemon:/sbin:/sbin/nologin
bin:x:1:1:bin:/bin:/sbin/nologin
root:x:0:0:root:/root:/bin/bash
以:为分隔符,按数字的方式给第3个字段进行反向排序(从大到小)

例3:
[root@redhat Testsh]# sort -nb -k3.2 cars
chevy malibu 2000 50 3500
honda accord 2001 30 6000
toyota rav4 2002 180 750
ford explor 2003 25 9500
ford thundbd 2003 15 10500
ford taurus 2004 10 17000
ford mustang 1965 45 10000
plym fury 1970 73 2500
bmw 325i 1985 115 450
chevy impata 1985 85 1550
chevy malibu 1990 60 3000
volvo s80 1998 102 9850
以数字方式(-n)忽略之前的空字符(-b),从第3 个字段的第2个字符开始排序

例4:
[root@redhat Testsh]# sort -b -k5n -k1f cars
bmw 325i 1985 115 450
toyota rav4 2002 180 750
chevy impata 1985 85 1550
plym fury 1970 73 2500
chevy malibu 1990 60 3000
chevy malibu 2000 50 3500
honda accord 2001 30 6000
ford explor 2003 25 9500
volvo s80 1998 102 9850
ford mustang 1965 45 10000
ford thundbd 2003 15 10500
ford taurus 2004 10 17000
忽略前边的空字符,按第5个字段数字方法进行排序如果相同则再按第1个字段排序并不区分大小写

例5:
[root@redhat Testsh]# sort -b -k3,3 -k1 cars
ford mustang 1965 45 10000
plym fury 1970 73 2500
bmw 325i 1985 115 450
chevy impata 1985 85 1550
chevy malibu 1990 60 3000
volvo s80 1998 102 9850
chevy malibu 2000 50 3500
honda accord 2001 30 6000
toyota rav4 2002 180 750
ford explor 2003 25 9500
ford thundbd 2003 15 10500
ford taurus 2004 10 17000
忽略空字符,从第3 个字段的第1个字符开始到第3 个字段尾进行排序,如相同再按字段1 进行排序,如果不指定k3,3的末尾,将会比较从第3个字段到行的结束,则不会有相同的行,就不会进行第二次的排序。

注意:同时使用-u 与-f时有时会丢失行所以最好这样用
sort -u -k 1f -k 1 test

1.6 split 将文件分成几部分
语法:split [options][filename[prefix]]
-a len  指定创建文件名后缀的长度为len个字符。默认为2
-b n[u]  将输入分成n个字节长的几个文件。u为可选的单位 b,k,m
-l num  将输入分解为具有num行长的文件。默认为1000
split -b 200 cars

1.7 sed
http://www.kumouse.com/article.asp?id=106

1.8 gawk
http://www.kumouse.com/article.asp?id=104

1.9 aspell

1.10 cmp 比较两个文件

1.11 comm 比较经以排序的文件

1.12 cpio

1.13 cut 从输入行中选取字符或者字段
语法:cut [options][file-list]
-c clist    选取由clist中的列号指定的字符。(各值用,分隔。列范图用-n,n-,n-m来表示)
-d dchar    将dchar作为输入字段的分隔符。默认为TAB.
-f flist    选择flist指定的字段。
–output-delimiter=ochar    将ochar指定为输出字段分隔符。
例1:
[root@redhat Testsh]# ll |cut -c57-90|grep ^[a-zA-Z]
apue2.zip
awk_glarr
awk_if
awk_out
awk_t
awk_t1
cars
Fibonacci_recursive.sh
Fibonacci_while.sh
find_uid
fordfile
if.ak
manuf
Recursive.sh
report
text.txt
tmp.sh
word_usage
xaa
xab
xac
xad
显示第57-90列,并去除空白的行

1.14 diff 比较两个文件的不同

1.15 fmt 简单地格式化文本
语法:fmt [options][file-list]
-s  截断长行但不填充短行
-t  除每个段落第1行外,都缩进
-u  改变格式化输出使得字之间为一个空格,句子之间为两个空格
-w n  将输出的行宽度改为n个字符。不带该

选项,fmt输出行宽度为75个字符
例:fmt -w 50 memo
将文件memo的宽度改为50字符,并输入到标准输出

1.16 od 根据指定的格式输出文件内容 648

1.17 paste 将文件对应行连接起来
语法:paste[option][file-list]
-d dlist  dlist是用来分隔输出字段的字符列表。如果仅有一个字符,paste将使用该字符替换TAB作为字段分隔符,如包含多个字符,这些字符轮流使用。
-s  一次处理一个文件,水平连接。

1.17 pr 给文件标明页码,以供打印 654

1.18 strings 显示可打印字符串